Coconut Flour

Coconut Peanut Butter and Jelly Cupcakes
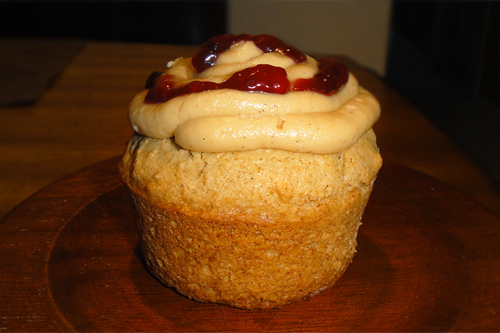
Coconut Peanut Butter and Jelly Cupcakes recipe photo
Coconut Peanut Butter and Jelly Cupcakes
photo by recipe author

Servings: 20-24
Preparation Time: 30 minutes

Cupcakes:

Peanut Butter Frosting:

Filling:

1 cup jelly of your choice. DO NOT USE spreadable fruit or a chunky style of jam. The smoother the consistency, the easier it will be to fill.

Cupcake:

Preheat the oven to 350 F. Insert 20-24 liners into a medium cupcake pan(s).

In a large bowl, cream together butter, peanut butter, and brown sugar with an electric mixer on medium speed until fluffy, about 3-5 minutes. Add the eggs one at a time. Beat well. Mix in the vanilla. Add the baking powder and salt and mix well.

If using all purpose flour, mix it into the peanut butter mixture, one cup at a time, alternating with the milk. If using either whole wheat or coconut flour, add it in 1/4 cup at a time.

Fill the cupcake liners 2/3 full. Bake for 15-20 minutes or until toothpick inserted in the center comes out clean. Cool cupcakes in the pan for 5 minutes then transfer to wire racks carefully. Cool completely.

Frosting:

Combine the peanut butter, butter, and vanilla in a medium bowl. Using an electric mixer, beat until light and fluffy, about 2 minutes. Beat in remaining ingredients. You can add more additional amounts of any of the ingredients to alter the taste and consistency to meet your personal preference.

Assembly Directions:

The easiest method to fill cupcakes is a piping bag and round tip. Fill the piping bag with 1/2 cup of jelly at a time. Insert the pointed tip into the top of the cupcake and slowly squeeze out the jelly. Each cupcake can hold about 3 teaspoons of jelly before it “explodes.” Once you have dispensed the jelly, slowly pull out the tip. It is ok if the jelly oozes out onto the top of the cupcake. The frosting will cover it.

Top cupcakes with frosting using a decorating tip or simply spread on with a spatula.

*If using coconut flour or whole wheat flour, you may not need to use the entire amount listed. Stop adding flour when the batter begins to get “stiff.” You can always add a little more milk to make the consistency more cupcake-like.

Recipe submitted by Jennifer, Orangevale, CA

Submit your recipe here!

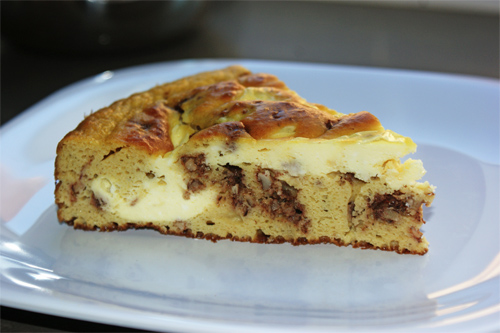
Gluten Free Cream Cheese Coffee Cake

Gluten Free Cream Cheese Coffee Cake recipe photo
Gluten Free Cream Cheese Coffee Cake
photo by recipe author

Preparation Time: 15 minutes
Servings: 8

Filling:

  • 8 ounces cream cheese, room temperature
  • 1 egg
  • 2 teaspoons maple syrup

Cake:

1. Preheat oven to 325 degrees F. Grease one 8-inch round cake pan.

2. Beat together all ingredients for cream cheese filling. Set aside.

3. Combine the first five ingredients for cake then add the dry ingredients through the salt. Mix well.

4. Toss pecans, cinnamon and maple syrup together in a separate bowl.

5. Pour cake batter into pan and drop bits of the pecan mixture throughout batter.

6. Top with cream cheese filling and use a knife or tooth pick to swirl it around.

7. Bake for 25 minutes and let cool before slicing.

Recipe submitted by Carrol, Huntington Beach, CA

Submit your recipe here!

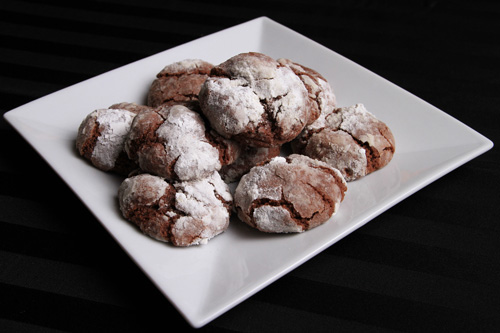
Gluten Free Chocolate Crinkles

It’s that time of the year again. Well seasoned and not-so-well seasoned cooks are pulling out (maybe even dusting) their cookie sheets and getting ready to bake up a storm of cookies.

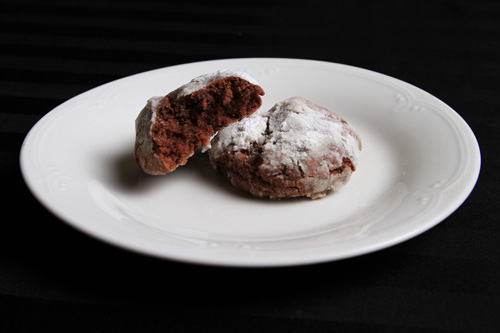
If you’re one of them, Chocolate Crinkles must be on your list of to-bakes. Seriously. Their soft, fudgy, chocolate-y, rolled-in-powdered-sugar goodness is just too hard to pass up.

Watch the video here:

Now that wasn’t too hard was it? And aren’t they pretty? It looks like snow.

These cookies are both gluten and dairy free, but they are not limited to those who are gluten and dairy intolerant. They’re really yummy, anyone will enjoy them.

Remember to adjust the bake time on these cookies depending on how large you roll the dough. If they’re smaller then 1 inch, start out at 8 minutes. You want them to be slightly under-baked when you take them out so they can finish cooking all the way while sitting on the cookie sheet. So keep your greedy little fingers to yourself and let them cool (if that’s even possible).

Enjoy everyone!

Sarah:)

Gluten Free Chocolate Crinkles

Gluten Free Chocolate Crinkles Cookies recipe photo
Gluten Free Chocolate Crinkles recipe photo with round plate
Gluten Free Chocolate Crinkles Cookies
Prepared by Sarah Shilhavy, Photo by Jeremiah Shilhavy

Servings: yields 3 dozen cookies
Preparation Time: 10 minutes plus chilling time

  • 4 oz bittersweet chocolate, melted
  • 1/2 cup melted coconut oil
  • 1 cup sugar
  • 3 eggs, at room temperature
  • 2 teaspoons vanilla extract
  • 2 cups gluten free flour mix*
  • 1/2 teaspoon xanthan gum
  • 1/4 teaspoon salt
  • 1 teaspoon baking powder
  • Powdered sugar

Transfer melted chocolate to a medium sized bowl. Whisk in oil and sugar. Mix in eggs, one at a time. Whisk the vanilla in. Mixture should be thick.

Add the flour mix, xanthan gum, salt and baking powder. Mix everything together (should be the consistency of brownie batter). Refrigerate for an hour or more, until the mixture has firmed up.

Preheat oven to 350 degrees F.

Place powdered sugar into a small bowl. Roll dough into small balls (dough should be stiff) and roll in powdered sugar. Place 2 inches apart on a cookie sheet greased with palm shortening, and bake for 10-12 minutes (just until tops feel slightly firm). Let cool on sheet for 3 minutes before removing to wire rack.

*Gluten Free Flour Mix:

Makes 3 cups

Mix all ingredients together and use as directed.

Recipe by Sarah Shilhavy

Submit your recipe here!

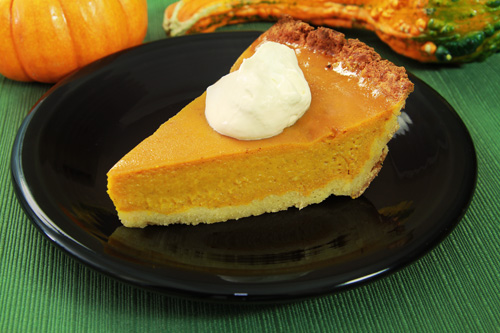
Gluten Free Coconut Flour Pie Crust

This gluten free pie crust isn’t like a regular, flaky pie crust (I’m still working on that one). It’s more like a cookie….almost. It has a bit of crunch, a little sweetness, and buttery all around.

It’s multipurpose too. The picture here shows a pumpkin pie filling, but you can use it in any recipe that calls for pie crust. If using it in a sweet recipe, you can add more honey to taste if you like. If you’re going for a savory filling, leave the honey be.

While you’re making this, mold it into the pie plate almost like you would like a graham cracker crust. The dough is going to be soft and delicate so you’ll need to press it into shape. And by the way, the 1/2 cup of shredded coconut can be taken out if you don’t want that extra “coconuttyness.”

Oh, and if you need a pre-baked pie crust, bake this at 350 degrees F for about….15 minutes maybe? Just keep an eye on it and take it out when it’s a nice light golden color. It’ll vary from oven to oven.

I have another fall recipe coming very soon, so stay tuned!

Sarah:)

Gluten Free Coconut Flour Pie Crust

Gluten Free Coconut Flour Pie Crust recipe photo
Gluten Free Coconut Flour Pie Crust
Prepared by Sarah Shilhavy, Photo by Jeremiah Shilhavy

In a medium sized bowl cut the butter and coconut oil into the coconut flour until mixture resembles irregular pea sized clumps. Add remaining ingredients except egg white. Mix together with your hands until a soft dough has formed. Pat dough into a 9 inch pie pan. When you are done forming the crust, take the egg white and beat it with a fork until frothy. With a pastry brush, brush the crust with the egg white just before filling.

Recipe by Sarah Shilhavy

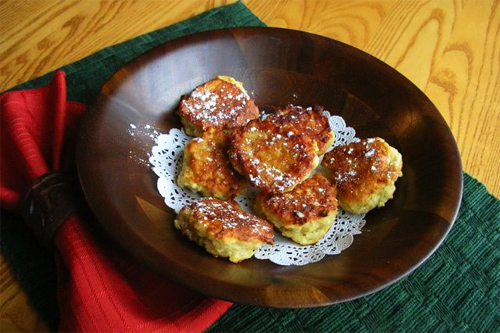
Coconut Rice Fritters

Coconut Rice Fritters recipe photo
Coconut Rice Fritters
Photo by recipe author

Servings: 2 1/2 dozen fritters
Preparation time: 30 minutes

  • 1 1/2 cup cooked long grain rice
  • 1/4 cup warm water
  • 1/2 teaspoon baking powder
  • 1/2 teaspoon salt
  • 1 teaspoon freshly grated nutmeg
  • 1 teaspoon honey
  • 1 cup organic unbleached all purpose flour
  • 1/4 cup coconut flour
  • 3 eggs, beaten
  • 2 tablespoons coconut oil
  • 1 tablespoon powdered sugar

Place the rice and warm water in a mixing bowl and mash the rice. Add the baking powder, salt, nutmeg and honey and mix well. Mix the two flours together, then, alternately add the flour and eggs to the rice mixture. Mix until smooth.

Heat the coconut oil in a large fry pan. Drop the rice mixture by level tablespoons into the hot oil. Cook 4 minutes on each side or until golden brown.

Transfer to paper towels and let them dry. Sprinkle with powdered sugar.

Recipe submitted by Pat, Jackson, WI

Submit your recipe here!

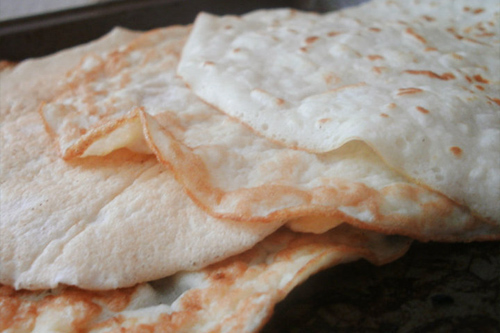
Coconut Flour “Tortillas”

Coconut Flour Tortillas recipe photo
Coconut Flour Tortillas
Photo by recipe author

Servings: 1 tortilla
Preparation Time: 2 minutes

Mix the coconut flour and baking powder with the water (or milk) and egg whites. Whisk or blend until all lumps disappear (I usually mix, then wait a couple of minutes and mix again).

Pour all the batter on a heated pan greased with coconut oil or butter (grease well). Pour batter in center of pan. Tilt the pan around to spread the batter into a large circle, almost covering the entire bottom of the pan.

Be very careful with this part: wait until the edges are brown on the side of the tortilla, or carefully circle spatula around the bottom of tortilla until safe to flip. Once safe, flip the tortilla and cook for about 30 seconds on the other side.

Fill with cream, berries, enchilada filling – anything you like!

These are thin and delicate. Use them for low-carb enchiladas, sandwich wraps, or anything you can think of!

* For the freshest coconut milk make homemade coconut milk. (See video at this link.)

Recipe submitted by Brandon, Dallas TX

Submit your recipe here!

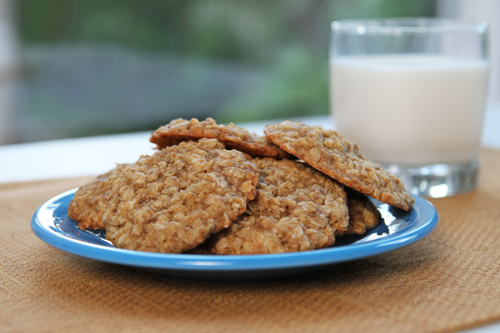
Triple Coconut Oatmeal Cookies

These cookies are great. They are very chewy and moist, and as far as cookies go, I’d say they’re pretty healthy.

I really recommend using the whole sugar if you have it on hand as it gives the cookies a bit of a caramel-like taste. But if you don’t, regular brown sugar will work.

You can use dried coconut chips, flakes, or even shreds with this recipe. I used the chips and no walnuts. And just in case you were wondering, no, I have not tried using all coconut flour for this recipe.

Please pass the milk. The cookies need to be dunked.

That is all.

Enjoy!

Sarah:)

Triple Coconut Oatmeal Cookies

Triple Coconut Oatmeal Cookies recipe photo
Triple Coconut Oatmeal Cookies
Prepared by Sarah Shilhavy, Photo by Jeremiah Shilhavy

Servings: 3 dozen cookies
Preparation Time: 15 minutes

Preheat oven to 350 degrees F.

Combine brown rice syrup, sugar, butter, coconut oil, egg, and vanilla and beat until fluffy.

In a separate bowl, mix flours, baking soda, and salt. Add to wet mixture and stir well. Stir in oats, walnuts and coconut.

Drop by (serving) teaspoons or a cookie scoop onto greased baking sheets. Bake in preheated oven for 10-15 minutes (edges should be golden brown). Cool for a couple minutes on the cookie sheet before removing.

Recipe submitted by Gail, Alpharetta, GA

Submit your recipe here!

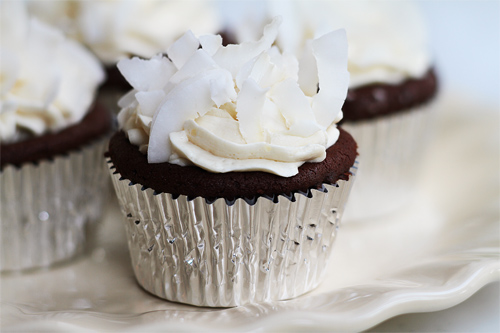
Gluten Free Coconut Fudge Cupcakes

If you love chocolate, then these cupcakes are for you. Even if you don’t love chocolate, I’m sure you’ll like these.

These dense, fudge-like cupcakes are topped with a fluffy, creamy, whipped cream-like frosting flavored with vanilla. The two are total opposites, but they get along nicely in this cupcake. And the best thing is neither the cupcakes nor the frosting has an overload of sugar. Who wants a mile of sugar fluff on their cupcakes anyway?

The cupcakes can be kept cold or on the counter at room temp, but I recommend storing them overnight in the refrigerator (if they even survive that long). Then, you can take them out to come to room temperature or eat them cold. I like them cold. Make them yourself, then tell me which way you like them.

Oh, and by the way, don’t worry if the cakes fall and crack in the center during cooling. That’s normal. It makes a great little bowl for the frosting.

The cool thing about these little guys is that they get better with age. I thought they tasted best 2 days after they were baked. But the best thing is: they’re gluten free, and completely foolproof. No one will ever know…

What’s your favorite cupcake flavor, and what kind of frosting do you like on them?

Until next time,

Sarah:)

Gluten Free Coconut Fudge Cupcakes
with Whipped Vanilla Cream Frosting

 Gluten Free Coconut Fudge Cupcakes recipe photo
Gluten Free Coconut Fudge Cupcakes
Prepared by Sarah Shilhavy, Photo by Jeremiah Shilhavy

Preparation Time: 15 minutes
Servings: 18-20 cupcakes

Cupcakes:

Preheat oven to 300 degrees F. Line a muffin pan with cupcake papers.

Melt the butter and chocolate together over a double boiler or over very low heat. Set aside to cool.

Using an electric mixer fitted with a whisk attachment beat the eggs, water, sugar and vanilla on medium high speed for about 3 minutes. Mixture should be foamy, pale in color and doubled in volume.

With mixer on low, slowly add the chocolate mixture. Increase speed to medium high and beat until well blended, 30-40 seconds. Scrape the bowl down with a rubber spatula once or twice as needed. Add coconut flour and cocoa and beat again for another 30 seconds. Scrape down once, if needed.

Fill the cupcake papers with the batter and bake in the preheated oven for 10-20 minutes. Cupcakes are done when a toothpick inserted in the center comes out wet with gooey chocolate clumps.

Cool in pan for 5-10 minutes before removing and cooling completely on wire racks. Chill until cold in the refrigerator if desired and frost with Whipped Vanilla Cream Frosting and top with coconut flakes. Store overnight in the refrigerator.

Whipped Vanilla Cream Frosting:

Pour a little milk into the corn starch to make a slurry. Add remaining milk to a medium saucepan and heat over medium heat. When milk is hot, add slurry, whisking constantly. Heat until mixture thickens, but do not let it come to a rolling boil. Milk should become extremely thick and almost paste-like.

Pour thickened milk into a bowl and cool to room temperature.

Beat the butter and sugar with an electric mixer fitted with a whisk attachment until very light and fluffy, about 5 minutes. Scrape bowl down and add vanilla. Beat for another 1-2 minutes.

Add the milk paste to the butter a spoonful at a time, beating well after each addition. When the milk has been added beat on high speed until frosting is light and fluffy and resembles whipped cream. Thin out with a little heavy cream if needed.

Frost cupcakes and enjoy!

Sarah Shilhavy

Submit your recipe here!